
When Dehaze Doesn’t Work
Lightroom CC 2015 introduced the long-awaited Dehaze adjustment and it works wonderfully – most of the time. The Dehaze adjustment can give mixed results and create areas with differences in vibrance and contrast. Have a look at this picture to see what I mean.

How to Dehaze Your Photos Manually
If you don’t have a subscription to Lightroom CC, then you’re in luck because you can still dehaze photos. This technique creates nearly identical results and it all starts with the Tone Curve. There are two modes and the default one will give you region sliders to adjust. Try adjusting the tone curve and you’ll see that Lightroom won’t let you create anything they think is overly intense. This is good for beginners but we can’t do drastic tone curve adjustment needed to remove fog. So if you’re in this mode, click on the bottom-right button.
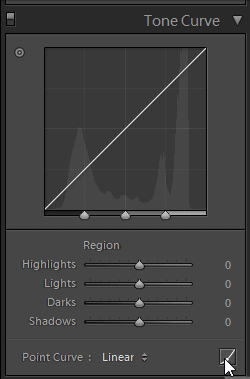
Next, add two points to the tone curve graph and create a curve like the image below. You don’t need to create an exact copy but it should look similar. When you do this, your image will get dark but look at the haze – it’s all gone.

Brighten the image back with the exposure slider then increase the contrast.

Next I tweaked the shadows and blacks for some added contrast. Reducing the highlights will restore the details the sky but I didn’t do it because it gave a fake HDR-like effect. Bumping up the clarity and vibrance might also help your photo.

The Results
That’s all there is to it folks. I personally find the results more natural and with less color artifacts. This isn’t to say that the Dehaze is a bad tool – it’s great most of the time and is a big time saver. But when it doesn’t work, you can count on this technique to fix your hazy photos.

For comparison purposes, I adjusted the settings to match the look of the Dehaze adjustment. The image on the left is edited with the Dehaze adjustment and the right is done manually. Compare the results below and let me know which one you think is better!

Additional Examples
This technique is also useful for people who don’t have a subscription of Lightroom CC. Here are a couple more examples for you to analyze.


Excellent tip and one I will use.
Just started using Photoshop. I will practice a bit more, then I will bookmark this page so that whenever I want to use dehaze I can come back to your guide. Thank you very much 🙂
really great tutorial, Thanks for sharing