

For me all this spheres have the same idea creating the main idea searching for harmony and good proportions playing with colors and light. I love to make photo shoots in my special creative way. So here are my tips that I want to share with you.
[aesop_gallery id=”1500″]
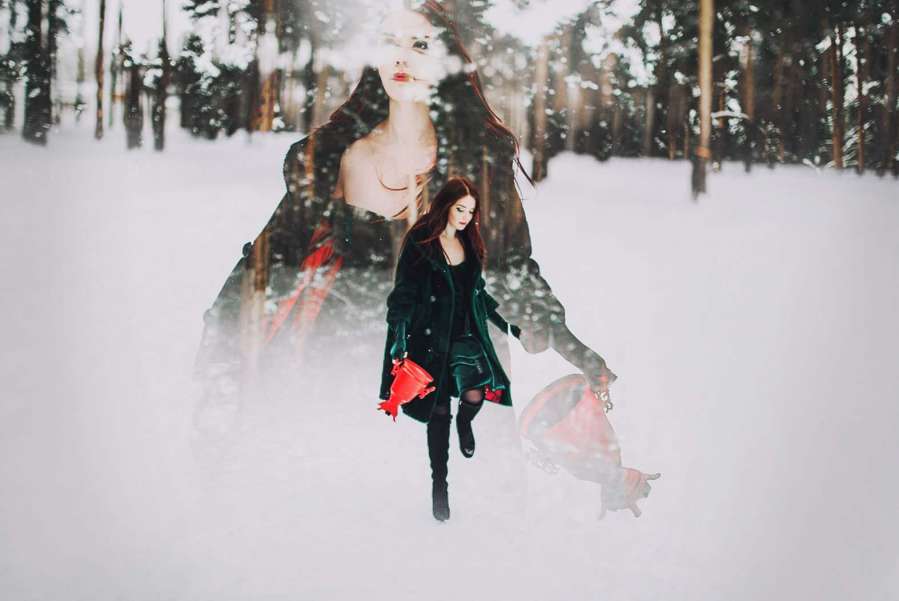
First Trick: Multiple Exposure
I love this method to make photos because it will surprise you, you’ll never know what you’ll get until the end. You can only guess how two photos will blend in your camera. So, if you have Canon 5d Marklll you can try this method right now.
However, here are some things you should know before shooting:
While shooting the first photo, try to remember how the objects are arranged on this shot and where the light and dark areas are. Then when you choose the composition for the second photo (in your multiple exposure mode that you will use for your first and second photo) you will have to imagine and visualize how the objects will overlap with each other.
[aesop_image imgwidth=”100%” img=”https://img.phototips.cc/wp-content/uploads/2015/12/5.jpg” alt=”Kristina Ponomareva” align=”center” lightbox=”on” captionposition=”left”]
So, if your remember the compositions on both photos and some ideas how to combine them, then you will have a more predictable result. But the spontaneity and surprises in multiple exposure are also interesting.
If you don’t have Canon5D Marklll you can always use Photoshop for this trick. Choose two photos that you want to combine. Put the first one on the second one. Choose how you will put or the effect of the second layer (second photo) – “Screen” or “Soft light” (which of them is more attractive for you). You can change the size and place of the layers. It usually helps in finding the best composition. And you’re done!
[aesop_gallery id=”1515″]
Here’s a more comprehensive tutorial about multiple exposure in Photoshop.
Second Trick: Magical Lines
Magical lines, it looks like I’m using a long exposure trick, but it’s really just Photoshop. It’s very easy to do. Take a small brush (1-10px) with 100% opacity and just paint!
[aesop_gallery id=”1523″]
I got an idea that the shining pieces the of dress and jewelry made this lines while moving, so I began painting the picture from the brightest areas. This is why it looks like as if the model was moving and her dress was flying around.
[aesop_parallax img=”https://img.phototips.cc/wp-content/uploads/2015/12/26.jpg” parallaxbg=”on” captionposition=”bottom-left” lightbox=”on” floater=”on” floaterposition=”left” floaterdirection=”up”]
Third trick: Big Rhinestone and Sequins
I wanted to get the effect that the girls on the bed and their face with other objects are laid out with really big girly shining things like rhinestone and sequins. So, I had no props like rhinestones on hand so I decided to trick it out. I made the photos without the shiny stuff (first with the model), then I printed the photo (small prints 10*15 cm) then I took the rhinestones and sequins and put it on the prints. Then I made the photos of these prints with rhinestone and sequins. This trick has a disadvantage, though, you will lose some quality you make the prints and the picture but I really loved this idea! I think it looks unusual.
[aesop_gallery id=”1525″]
Kristina Ponomareva
I am 23-year-old photographer from Russia. I love traveling. I studied in an Art Academy (architecture and design), and worked as portrait and wedding photographer for the last 6 years, during the 3 years, I taught in a photo school and made decorations for photo studios. I also love working as a designer and a decorator. For me, all these spheres have the same idea – creating the main idea, searching for harmony, good proportions and playing with colors and light. I love to take photos in my special creative way.